Sunday, November 23, 2014

What We're Working on Nov/Dec 2014

The neighbors have all pulled their boats from the lake and the trees have dropped their many, many leaves. It's unofficially the winter season around here.
We took a brief house hiatus to work on Halloween costumes and to enjoy a trip to Disney. Now that we're home the goal is organization. We finally got the garage cleaned up enough to put both cars inside. Just in time for the snow to fly! D has worked had to build overhead storage for the garage and I hope to have the kids toys hung up in baskets on the wall this spring (very similar to our old house if you ever saw that arrangement). I'm also thinking about bike and scooter parking possibilities but for now they can be pushed to the back of the garage. Our kayaks are hanging from the ceiling for the winter and our bikes are mounted on the wall.

Still lots of outdoor things to get organized, but it's progress

I also got the front hallway/mudroom cleaned up. For now we're using command strips to hang up coats and hats but I hope to eventually have built ins. Similar to this...

One of the many mudroom inspiration photos
Our mudroom right now has plain closet doors will be switched out for 6 panel doors that close properly. For now I'm just happy to have room in the closet for our snow gear and the boys' winter bags for school (filled with boots, snow pants, hats, mittens..) and for a place to hang backpacks and coats.

In the kitchen, we removed the old vent hood from the oven area and purchased a stainless steel, mounted microwave. It was really great to retire the small microwave we were using as it was originally sitting in our bar at the old house and is not meant for high volume cooking. Now, without the hood, the kitchen feels more modern. D installed small cupboards over the microwave. We had to think about this arrangement because those cupboards are pretty inaccessible and we were wondering if it even made sense to have them. On the website, Houzz, I've seen people put in wine racks or use the space for decorations. In the end we decided to go with cupboards to store things that we like to have around but don't need to have out all the time: camelbacks for running, water jugs for soccer games, etc.

The original kitchen oven and vent hood

New mounted microwave with cabinets (still need to add the door pulls)

A new double oven was just delivered as well
(I didn't even take the sticker off before snapping a photo).
Drawer and cabinet pulls were added to all the kitchen cabinets.

We ran into a bit of trouble getting cabinets to match our existing set. We decided to purchase the same style but in a different color since we will painting or staining the entire kitchen. The paint or stain color is still up in the air. I love the look of the dark cabinets, especially now that we have some, but I have my heart set on dark wood floors. With the large amount of mature trees in the area, we don't have a ton of sunlight in the kitchen. I am concerned that dark floors and dark cabinets will be too much. An alternative is white cabinets and dark floors. Plenty of time to continue researching, thinking, and seeking examples on Houzz since the kitchen will be a summer project.


Dark kitchen cabinet example with stainless appliances

White kitchen cabinet example with dark floors, modern lighting. 
I'm really leaning toward the white with the dark floors. We'll have to be careful that it doesn't slip into the "country" esthetic...probably my least favorite style. But the white with dark floors is a complete change from our old house and that's what we're hoping to accomplish. Still plenty of time to think about it while I organize the play room and loft.

What's up next: 1) Finishing the ceiling and walls in the loft area (that's what we're calling the bonus play area between the boys' rooms). We removed an oddly placed ceiling fan and added recessed lighting but still need to patch and paint. 2) Selecting stone for the new fireplace surround. We replaced a wood burning fireplace with a gas insert. In order for the guys to run the gas line, we had to demo the existing tile. It was on our list of things to do anyway, it just jumped to the front of the line. We are absolutely loving the gas fireplace! 3) Post about the boys' bedroom makeover. So excited to share this one! I finally finished the paint and I am waiting on two deliveries before the "final reveal." 4) Find our Christmas decorations! 


Sunday, October 12, 2014

Laundry Room: Final Reveal!

I am happy to be able to post the "after" pictures of our laundry room make-over.
First, a quick refresher of what it looked like when we moved it. Remember the whole "paint melting off the walls" thing? So glad to be past that.

The "Before." 

Wasted space that was piled with boxes when we toured the house.
Flat panel oak doors, wire shelving, single light. 


Now...the final reveal!!


It's very hard to get a full shot of the laundry room since I'm backed up against the hallway wall as far as I can go.
New cabinets from Lowe's. Newer front loading washer and dryer brought over from the old house. Folding counter (mostly used as a stained clothing pre-treating area). New sticker from The Vinyl Letter shop on Etsy. Replaced the outlet covers with clean white ones. Drawer pulls from Ikea.

Right hand side of the room

On the right hand side of the room we put our Ikea drying rack brought over from the old house. It folds down when not in use and is mounted high enough to walk under when it's out. You can also see the new 6 panel folding doors. We decided to go with solid core doors here to help with sound dampening. We also were able to re-purpose the lights from B's room. They make much more sense in here vs the previous owner's choice of over the closet in the bedroom.

Left wall of the room

On the left hand side of the room we mounted a fold down ironing board...not that we do much ironing. Mostly I have the iron for my craft/sewing projects. This was a clearance, spur-of-the-moment purchase from Lowe's and I love it. Our previous ironing board was big and bulky. It made a horrible screeching noise when it was opened. We rarely used it because it was so awkward to get out of the closet where we stored it. The built-in is so convenient, readily available, and takes up minimal space. D had to wire an electrical outlet on this wall because the room had none. You can also see my Life Expressions Decor sign made by my friend, Jill, which I had in our old house. It says, "The most memorable days usually end with the dirtiest clothes."

View of the built-in ironing board. 


Not everything is new. We kept the flooring which is vinyl but in good condition. We re-purposed the lights. The paint was left over from the kitchen in our old home.


The finished product is just how we envisioned. I feel like it really reinforces our plans to make this house into something special.

Friday, October 10, 2014

Bedroom Paint Teaser


I think we have been painting off and on for about 7 weeks now. It's my fault because I decided to do a more elaborate paint pattern in the boys room. I thought I would try out stripes in one bedroom and decide after that if I wanted to do the second bedroom. Unfortunately/Fortunately it is turning out better than I expected. That means I have two bedrooms to do....two bedrooms that are larger than the bedrooms at our old house.
Since we only seem to have evenings to work on projects like painting, the boys have been taking turns having "sleep overs" in the other brother's room. Once they are asleep, they don't hear a thing and we can work on whatever we want. I think we've run saws in the next room while they've slept!

Here are the colors that they chose. They had free rein to pick whatever they wanted in their rooms. I guess I should say "free rein within reason" because we had to veto the first idea. B was really pushing for a rainbow room. It wasn't that I didn't think rainbows were a good idea, it was that we didn't want to buy all those different colors of paint!
See if you can guess which kid goes with which color. If you've spent time with the boys over the past few months, this will be easy for you. :)

Bright Blue with Greige
(Slight color cast in this photo, sorry). 
Bright Green with Gray

We purchased the light switch covers this year at the Ann Arbor Art Fair (they also decided to buy the same covers).
The green room is 90% done. I'm scaling down my original paint plans but I still want to add in an accent stripe. The blue room is about 70% complete. I think the final results will be very cool and very grown up...more "boy" room versus "toddler" room... and should last them a number of years. 
Halloween is fast approaching so I have some other projects taking up my time. Hopefully the bedrooms will be done by Christmas. Kidding! I hope.

I also learned a nifty little paint trick...wrapping and putting your wet paint tray and rollers in the freezer until your next use. If you haven't heard about this one, you can read the tips here from Home Depot, although I originally saw the article on This Old House. This has saved me countless hours in clean up. The article says store overnight, but I've put the rollers in my chest freezer for a week and they were fine.
If you have heard about this then I ask you, dear friends and family, why did you not share this with me?!! It has been the biggest time saver especially since I only paint for about an hour at a time.
And on that note, I'd better get back to work. Up next...Laundry room reveal! 

Saturday, October 4, 2014

New Garage Entryway

A simple project that I had been wanted to tackle was the garage entry door. It's the door we use most and, therefore, I see it the most. It was dingy and dirty from years of hard use from the previous owners. The door itself was in decent condition but the streaks of unknown origin could not be scrubbed away. Gross. Paint to the rescue!

Garage door during our epoxy phase. Cream door, very blah. 

Several things I learned in this project....
One, read labels carefully. Just because you picked it up near all the other paint containers at Lowe's, does not mean it is water-based like you are used to. Probably shopping with twins in tow is not the best choice...tra-la-la...oh! Paint for the door! It says "door paint." Perfect! *drops in cart without reading*  

Two, do not try your new additive for water-based paint in the oil-based paint.They will not play well together and when you turn your back, it will have eaten through the cup and spilled entirely on your husband's freshly painted garage floor. Black paint everywhere. This may or may not have resulted in one tearful phone call to said husband and a trip to Lowe's with black paint covered hands to purchase mineral spirits and rags. Thankfully the cashier had the brains not to comment on that one. (Hubby was awesome about the accident, by the way, and used his lunch hour to help me clean up).

Lesson three, sometimes ideas from the internet are awesome.  :)

New garage entry door. Sorry about the grainy photo from my phone.
I love the final result and I could not be happier. Now I just need to find an equally cute entry mat.
Black paint, brushed nickle kick plate, coded lock in nickle finish all from Lowe's.  Custom vinyl applique from The Vinyl Letter on Etsy.

Tuesday, September 30, 2014

Front Landscape Part One

Updating the front yard landscape was not on the weekend's to-do list. We were supposed to be cleaning up the garage and moving the final boxes to the basement. Morning frost had arrived and we're not keen on parking overnight in the driveway as the weather gets cooler. I think it's all those years in apartments and having to scrape off the car windshield every morning. Not a fan.

But the weather was beautiful and Lowe's had some plants on clearance. And frankly, the yard was bugging me. I hated the first impression it gave and the sloppy unkempt appearance. The former owners had planted a ton (and I mean a ton) of sun loving day lilies. I like day lilies but the sheer quantity was too much. Plus the front yard has 3 huge trees and hasn't been a sunny yard in at least 20 years. It was time to upgrade this home's curb appeal.


The front walkway. Lots of lilies, hostas and one coneflower.
Looking at the photo here, it doesn't look too bad...and that's
really starting to bug me about this house. It's hard to convey
why we are changing so many things when it doesn't appear
to be too bad in the photos. *sigh* 
Front door with bay window on the side. More day lilies. 

I had researched local landscape nurseries and there are not a ton in the area. The few I visited had $40 price tags on single shrubs. Yes they were large plants, but that kind of price to re-do the entire front yard would quickly be out of our budget. So to keep on budget I selected smaller plant from Lowe's. I'm hoping with the pep talk the boys and I gave them, along with some spring Miracle Grow, they will fill in the space nicely.

I tore out the old plants and reused what I could. B and T loved loved loved digging out the old plants. Fill dirt and mulch were added to the new bushes. The bricks were moved from another area and re-purposed here. They were lovingly sorted and placed along the walkway by the boys but will need to be leveled eventually.
The two areas nearest the house are complete. I have bids out to remove the birch tree near the front porch.The large area near the front trees is still under construction and probably won't be completed until spring


New walkway area. I added a row of shrubs with a row of hostas.
Note to the photographer: next time take photos before the storm
comes and blows leaves and dirt everywhere. Note the birch tree in the
right side of the photo which is getting cut down in the next week or two. 

Front walkway: After. I'll have to make a mental note to post
again when the shrubs grow a bit next year. I am happy to
have some place to put Christmas lights! 

Front porch area. I would call this area "semi complete."
We will need to add pavers or some sort of retaining wall,
move the garden hose, and add an underground
gutter drainage pipe (instead of the green thing).


There is still a lot to do in the front yard before I will call this area complete but the progress really makes me feel better about the curb appeal. We have 3 large maple trees in the front which need to be trimmed up. There is also a large semi-landscaped area underneath 2 of the trees. Planted there are....you guessed it...more day lilies. I did tear out some of the leafy perennial flowers but I think I can live with the rest until spring. 
Check back in the spring for Front Landscape Part Two. :)  

Friday, September 5, 2014

Second Floor Carpet

The second floor of the house had carpet in most of the rooms. It was in okay shape in the master bedroom, but pulling away from the walls in several areas in the loft and B's room. Not knowing the history and the age of the carpet, we decided to go ahead and have the entire second floor replaced. T's bedroom had original hardwood floors. Pretty, but I've never been a fan of hardwood in the bedroom. Especially in a room where a child walks like an elephant.


T's bedroom with original hardwood floors. 

Master bedroom carpet. In decent condition. 


This was also our one opportunity to fix the sub-flooring. We chose to go the harder route and do the tear out of the old carpet ourselves. It wasn't so much a cost issue but more so that we wanted to fix the squeaks and slight undulations. We spent almost a week pulling out all the squeaking nails in the subfloor and replacing them with screws. D fixed the stairs with a combination of screws and caulking.

Assisting with the carpet removal.

We also found original hardwood in B's bedroom under the carpet. It was not in great condition. It did give us some insight to the original layout of the house. Unfortunately because we need to do the tear out and repairs, we can't have any furniture put in their proper places until after the carpet is installed. Boxes remain piled up everywhere and furniture is squashed into the bathrooms. Everyone is camping out on air mattresses in the master bedroom.


The final result was well worth the time. The floor feels so solid. It no longer has the squeak and groan of an older house. The new carpet immediately improved the overall feel of the home; it feels richer and more cozy.

                                           Hard to get a good photo of carpet but it's a nice neutral brown with                                            flecks of tan and white. Adorable children sold separately. 
Now we can finally get the upstairs organized. Right? Maybe. There is still the laundry room to finish and the outdoors is calling to us. We plan to take a break from renovations in order to enjoy the tail end of summer and to get a bit more organized. Turns out the former owners left us a bonfire pit! Time for some yummy s'mores.


This is what summer is all about. The house can wait. 


Tuesday, September 2, 2014

The Day The Walls Melted

"Lets just get this room done, it won't take long." Said no smart renovator ever. The universe knows when you start to say such things and immediately takes you down a peg. In fact, don't even think it.

We wanted to get the laundry room done before the furniture arrived. Mainly, before the movers hauled the heavy washer and dryer up the very narrow stairs. We knew that once it was in place it would be very difficult to paint around. We had that problem in the old house- it was nearly impossible to paint properly and we ended up with some blank spots on the mid and lower wall behind the machines. At the old house the orientation of the room didn't make it very visible. But at the new place you could probably see some of the old color peeking out and that would've bugged me.

The old laundry room was a very....um....interesting color choice. Kind of a salmon-ish color that looked sponge painted on. On the left hand side of the room was empty, but every time we toured the house prior to closing it was piled with junk...laundry baskets, clothes, boxes. The cabinets were a cheap MDF with no backer so when you opened the door you could see the wall. Like all of the doors in this house, the laundry room had flat panel hallow oak doors that were immediately removed. The overhead light was a dome with a single bulb. The outlet covers were an almond color. (Ewww.That always looks so dingy to me)
Having searched Houzz and Pinterest for months, I had a very specific vision for what this room could become.

The laundry room "before." An interesting color choice.


First up was paint. Simple enough. Or not.
I decided to reuse the paint from our old house that we had in the kitchen. We had originally bought enough paint to do the kitchen and the large front room there, but just never got around to it before we decided to move. It was a full gallon in shade of blue-gray.
I started to roll on the paint...turned to check my work.... and the paint was dripping down the wall. Weird. I chalked it up to a new roller with a thicker nap; clearly I am using way too much paint and need to back off.
Started again. Same thing. The paint is literally melting down the wall. D determines that it is old paint and it needs to be stirred up properly. He stirs it thoroughly and begins to paint.
I wish pictures could do it justice. The only way I can think to describe it is a bad horror movie. The kind where the main character turns, the camera pans to the wall, and....*scream* ...the wall is bleeding.
Yes, a bit dramatic, but I've never seen anything like it before and I've done a lot of painting.


Impossible to get a good picture of the wall repelling the paint. 
You could literally wipe the paint off the wall.


Two coats of primer later the new paint started to stick. I think we finally concluded that the original paint was not sponge painted on, but some sort of glazing technique. The kind where you paint your top color on and then wipe it off. Not sure of the name but I think I've seen it on HGTV. The kicker is I think this same technique is in the master bathroom. *Yay!*

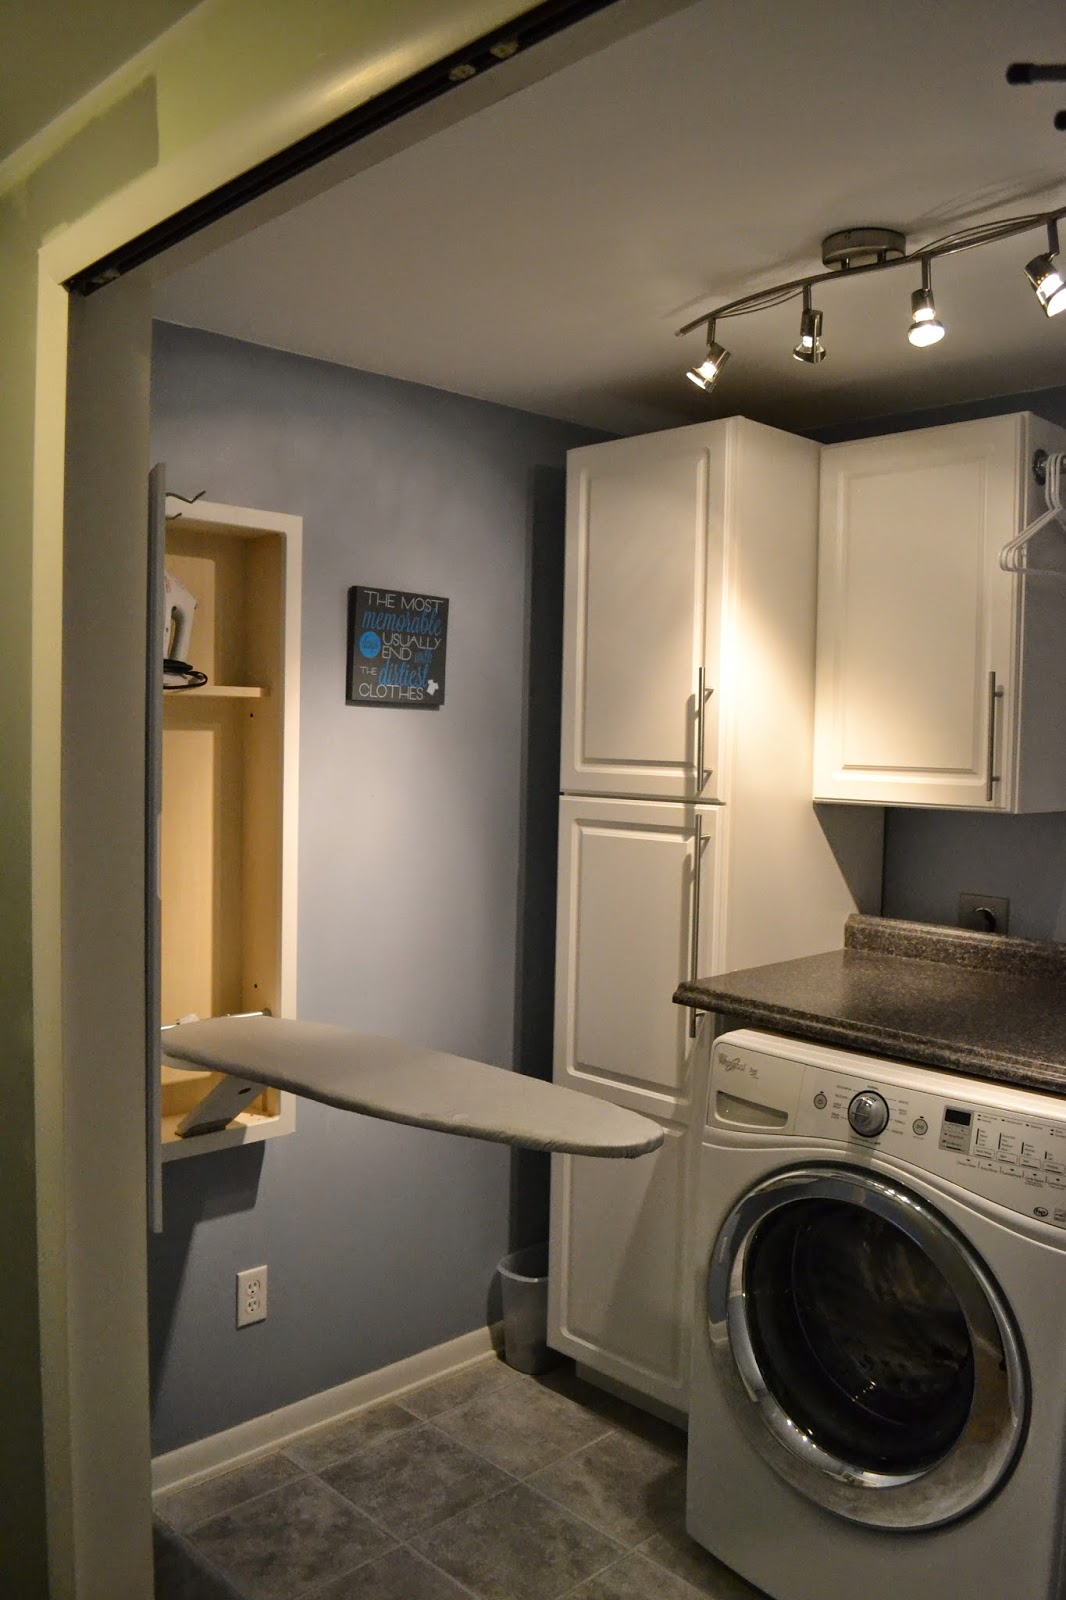
In the end our simple laundry room painting took one night and one personal day off of work. Just a reminder never to say how easy a project will be before starting it. The washer and dryer did fit up the stairs. We were both very happy not to be the ones trying to drag them up there. We purchased new cabinets from Lowe's in a crisp white. We bought modern drawer pulls and door handles from Ikea. The light would not be saved but we did re-purpose the track lighting from B's room for the laundry. D installed a counter top over the front loading washer and dryer. We still need to install the built-in ironing board, purchase the doors, and add the drying rack. I'm not quite ready for the final reveal, but I hope you'll check back for the results! Posting soon....