Friday, June 12, 2015

Fireplace: So Close To Completion

We've been working on the fireplace for a while now and it's almost...almost....almost done. Since it's our main room and since the scope of the project has expanded, it's taken a while to complete. But I looks so good I can't wait a minute longer to post. If you'd like to refresh your memory about our fireplace progress, you can find my other posts here and here.


A quick view of the room on move-in day. We saw potential. 


Our family room: June 2015.
It's so pretty, I almost can't believe it was all DIY. 
You almost don't notice the blue carpet...almost


Now for a few close up photos and some more before & after's. 

With the hearth tile removed during the gas line installation
Our final stone choice
I am very pleased with our stone choice. It did take more time, energy and prep-work to install than other products on the market but I love the authentic look. It has weight and varied shapes that I love. We painted over the brass accents on the fireplace with black heat paint and switched the handles to a brushed nickel. 


Side view on move-in day


Here you can check out the new paint color- Sherwin Williams Versatile Gray. It's a nice mix of tan and gray. When wet it's reminiscent of a melting Wendy's Frosty. Yum! 


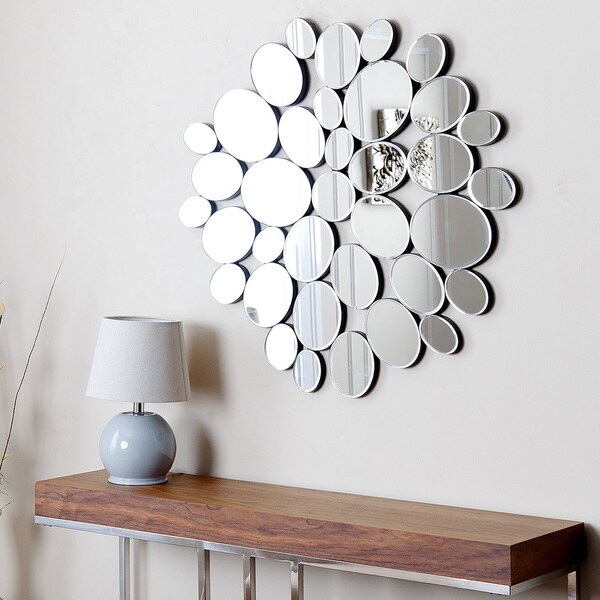
I purchased this mirror off Overstock for the space over the couch. I was looking for something to reflect the light coming in from the windows on the opposite wall but I didn't want a solid mirror. When we finish the touch ups on the wall, we'll be able to hang it up. That sucker is heavy!


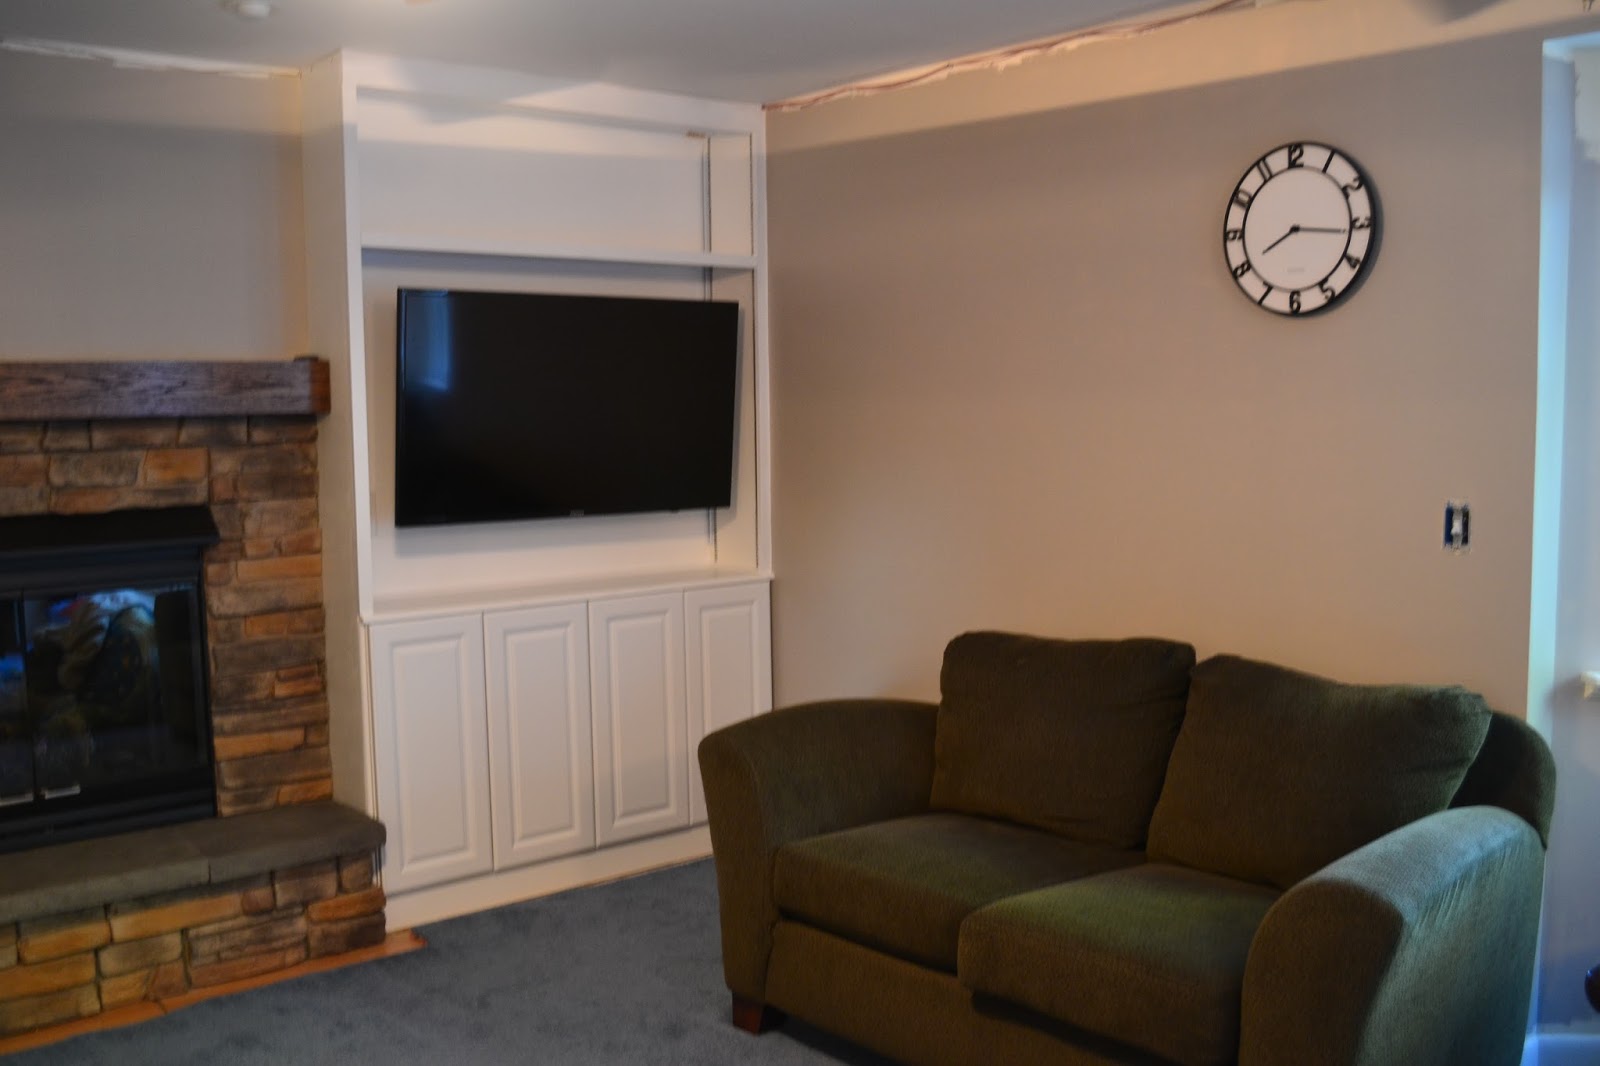
We were able to salvage the ceiling fan by purchasing a new light insert and new fan blades in a walnut color. 
The shelves took a long time to complete. D measured and built them. I did several coats of paint and several coats of polyurethane. With dry time in between coats plus limited work time, the shelves alone took several weeks. They're so beautiful...completely worth it! 
Little fact: the cabinets we used on the built-ins and not base cabinets but upper cabinets. D added a small platform to turn them into base cabinets. We didn't want the cabinets to dwarf the fireplace hearth or make it appear recessed, so the depth of an upper cabinet was a better fit. :) 


Still to do: paint and install the crown molding which will cover the surround sound speaker wire; install the cabinet door pulls; second coats of paint around all the windows and 
in the dining area (not able to be seen in these pictures). 
We're looking at new couches to better fit the scale of this room and we'll 
decorate the shelves with books and photos. 
So far the room looks larger and more modern. I LOVE IT. Is this even the same house??!!
Can't wait to post the final final reveal. 


Wednesday, June 10, 2015

Mailbox Part Deux

With the weather warming up, the house progress has moved toward outside projects. The first was replacing our mailbox...again. I really loved our salvaged and re-painted mailbox but the winter was hard on it. The paint started to chip, especially around my Michigan sticker. If you'd like to refresh your memory and check out what the blue mailbox looked like, you can find my post here. Our mail carrier seems pretty reliable at this house, and I was feeling bad that the mailbox post was so low. Actually, I checked the postal guidelines and measured the height of the box...it was a good 12 inches lower than the standard.  I felt bad that our carrier had to lean way out of her truck to use our box. Plus she wrote us the nicest thank you note at Christmas after we left her some treats, so I felt good about fixing the dumb mailbox.  We decided on a plastic post cover, and a plastic box. No maintenance! D was able to trim the existing wood post so that the new plastic sleeve would slide over the top. The house numbers cracked in my hand when I tried to remove the screws, so there was no re-using them. New house numbers and a different Michigan sticker....done!

New box and post  (address edited)
Our happy little post was in place for about 3 weeks when it was hit by a car...or maybe a golf cart...we're not sure which. (Some people in our neighborhood use golf carts to get down to the beach).  *Heavy Sigh* That ugly box was there for years without a problem. We get 3 weeks. The neighbors were really nice about the whole thing (since it was their guests' fault) and they bought us a new post. Hopefully that will go in this weekend....and be there a long time!!


Speaking of set backs...we had another. Remember our beautiful garage floor? 


And the week that D put into scrubbing, washing, painting, sealing....?


It's not so beautiful now. NOT HAPPY. These are the photos I submitted to Rust-Oleum to get our "money back guarantee."


I read the reviews and I saw that a few other people had complained about the same thing...the finish just rubbing right off with minimal use. But poor reviews can not always be trusted- who knows if the people followed the proper steps or did all the prep work. We had such success at the old house with the product- even after 10 years of use- that we decided to purchase it again. As you can see from the photos, they must have changed the formula because my hubby did all the prep work and followed all the steps. Even in the areas with no car traffic, like in front of the door, the floor is just rubbing right off! Soooooo not happy. After submitting photos to Rust-Oleum they gave us the choice of refunding our money or trying a new product. It was a toss up...even if we got our money back, we'd still need to repair the floor. So they sent a new kit. Not sure when we'll have a week to work on the garage floor again. I don't see that task being high on either of our priority lists.  :(


But onward to progress! Playing outside in the summer, I spend a lot of time looking at the exterior of our house. I got so I could not stand the color of our shutters. We would love to have the whole house painted in more of an updated color scheme, but that's another job for another time. For now I'm happy with small updates. 


My helpers cleaning the shutters

Final product. Perhaps a little too light in color, but overall I'm happy. Time to power wash the bricks. 


We've also been working on small projects that make a difference in the overall feel of the house. The first is burying the gutter down spouts and getting rid of the eye sore plastic drains. Not only will this help the appearance of the house but it should help with the soil erosion. 


Front yard "before." Note the green gutter extender. 
Front porch gutter "after."  Still working on the landscaping/edging. 

A few other photos of our progress. D and his father put up our new shed. It's so wonderful to have someplace to store our life jackets, toys, kayak paddles, etc. 


D also made this great kayak rack. Check our the boys' mini kayaks! 


I also cleaned up the side of the house and made room for a small veggie garden. There's room for expansion if we want it.


Now I'm trying to decide on changes to the front porch. The front door is being switched out. I don't prefer the style with the glass for privacy reasons. I'm open to suggestions on what to do with the eye sore of a utility box....got any ideas? 


Front porch today
Perhaps some sort of trellis?


I added the finishing touches (color) to this inexpensive outdoor rug and got my flower boxes planted. So, for now I'll just be enjoying the view from the deck :) Happy Summer!